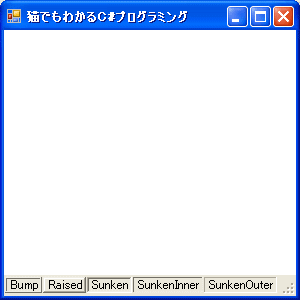
 XXInnerとか、XXOuterの違いは微妙ですね・・・
 C#2.0では、StatusBarクラスの機能が拡張されたStatusStripクラスを使うことができます。もちろんStatusBarクラスを使ってもかまいません。
StatusStripクラスの継承関係は次のようになっています。
System.Object
   System.MarshalByRefObject
     System.ComponentModel.Component
       System.Windows.Forms.Control
         System.Windows.Forms.ScrollableControl
           System.Windows.Forms.ToolStrip
            System.Windows.Forms.StatusStrip
このクラスのオブジェクトを作成して、Parentプロパティに親のFormを指定します。StatusBarクラスで作った、ステータスバーには、通常StatusBarPanelを載せましたが、このStatusBarParnelに相当するクラスが、ToolStripStatusLabelクラスになります。これも、C#2.0以降でないと使えません。
ToolStripStatusLabelクラスの継承関係は、次のようになっています。
System.Object
   System.MarshalByRefObject
     System.ComponentModel.Component
       System.Windows.Forms.ToolStripItem
         System.Windows.Forms.ToolStripLabel
          System.Windows.Forms.ToolStripStatusLabel
このクラスで、よく使うプロパティは次のようなものがあります。
| プロパティ | 意味 |
|---|---|
| BorderSides | どの側に境界線を表示するかを取得・設定。ToolStripStatusLabelBorderSides列挙体で指定する。 |
| BorderStyle | 境界線スタイルの取得・設定。Border3DStyle列挙体で指定する。 |
| BackColor | 背景色の取得・設定。 |
| Text | 項目に表示されるテキストの取得・設定。 |
さて、ToolStripStatusLabelBorderSides列挙体のメンバと意味は次の通りです。
| メンバ | 意味 |
|---|---|
| All | ラベルのすべての側に境界線を付ける。 |
| Bottom | 下側のみに境界線を付ける。 |
| Left | 左側のみに境界線を付ける。 |
| None | 境界線を付けない。 |
| Right | 右側のみに境界線を付ける。 |
| Top | 上側のみに境界線を付ける。 |
メンバ値は、ビットごとの組み合わせが可能です。
Border3DStyle列挙体のメンバと意味は、次の通りです。
| メンバ | 意味 |
|---|---|
| Adjust | 境界線は指定した四角形の外側に描画される。 |
| Bump | 境界線の内側と外側が浮き出している。 |
| Etched | 境界線の内外がくぼんだ状態となる。 |
| Flat | 3Dスタイルは適用されない。 |
| Raised | 境界線の内外縁で浮き出す。 |
| RaisedInner | 境界線の内側だけが浮き出す。 |
| RaisedOuter | 境界線の外側だけが浮き出す。 |
| Sunken | 境界線の内外がくぼんで表示。 |
| SunkenInner | 境界線の内縁のみくぼんで表示。 |
| SunkenOuter | 境界線の外側のみがくぼんで表示。 |
ToolStripStatusLabelオブジェクトをステータスバーに載せるには、ToolStrip.Items.Addメソッドを利用します。もしくは、AddRangeメソッドを利用します。Itemsプロパティは、ToolStripItemCollection型です。
では、サンプルを見てみましょう。
// statusstrip01.cs

using System;
using System.Drawing;
using System.Windows.Forms;

class statusstrip01 : Form
{
    StatusStrip ss;

    public static void Main()
    {
        Application.Run(new statusstrip01());
    }

    public statusstrip01()
    {
        Text = "猫でもわかるC#プログラミング";
        BackColor = SystemColors.Window;

        ss = new StatusStrip();
        ss.Parent = this;

        ToolStripStatusLabel tssl0 = new ToolStripStatusLabel();
        tssl0.BorderSides = ToolStripStatusLabelBorderSides.All;
        tssl0.BorderStyle = Border3DStyle.Bump;
        tssl0.BackColor = SystemColors.Control;
        tssl0.Text = "Bump";

        ToolStripStatusLabel tssl1 = new ToolStripStatusLabel();
        tssl1.BorderSides = ToolStripStatusLabelBorderSides.All;
        tssl1.BorderStyle = Border3DStyle.Raised;
        tssl1.BackColor = SystemColors.Control;
        tssl1.Text = "Raised";

        ToolStripStatusLabel tssl2 = new ToolStripStatusLabel();
        tssl2.BorderSides = ToolStripStatusLabelBorderSides.All;
        tssl2.BorderStyle = Border3DStyle.Sunken;
        tssl2.BackColor = SystemColors.Control;
        tssl2.Text = "Sunken";

        ToolStripStatusLabel tssl3 = new ToolStripStatusLabel();
        tssl3.BorderSides = ToolStripStatusLabelBorderSides.All;
        tssl3.BorderStyle = Border3DStyle.SunkenInner;
        tssl3.BackColor = SystemColors.Control;
        tssl3.Text = "SunkenInner";

        ToolStripStatusLabel tssl4 = new ToolStripStatusLabel();
        tssl4.BorderSides = ToolStripStatusLabelBorderSides.All;
        tssl4.BorderStyle = Border3DStyle.SunkenOuter;
        tssl4.BackColor = SystemColors.Control;
        tssl4.Text = "SunkenOuter";

        ToolStripStatusLabel[] ts = { tssl0, tssl1, tssl2, tssl3, tssl4 };
        ss.Items.AddRange(ts);
    }
}
実行結果は、次のようになります。
 XXInnerとか、XXOuterの違いは微妙ですね・・・
Update 25/Mar/2007 By Y.Kumei