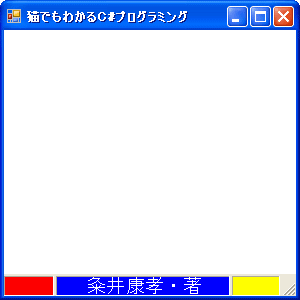
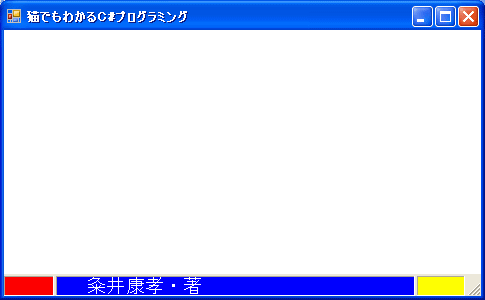
 さて、このフォームの境界をドラッグしてサイズを変更すると・・・
 ステータスバーは、オーナードローすることができます。
オーナードローすることにより、独自の外観をもつステータスバーを作成することができます。
さて、どのようにするかというと、StatusBarPanelクラスの、Styleプロパティを設定します。
public StatusBarPanelStyle Style { get; set; }
StatusBarPanelStyle列挙体のメンバと意味は次の通りです。
| メンバ | 意味 |
|---|---|
| OwnerDraw | パネルはオーナーによって描画される |
| Text | パネルは標準フォントでテキストが表示される |
オーナードローするには、当然OwnerDrawを指定します。
さて、ここで注意すべき点は、オーナードローするタイミングです。
これは、StatusBarクラスのDrawItemイベントが発生したときに行います。DrawItemイベントはStatusBarPanelクラスではなく、StatusBarクラスから発生する点に注意してください。
public event StatusBarDrawItemEventHandler DrawItemStatusBarDrawItemEventHandlerデリゲートは次のようになっています。
public delegate void StatusBarDrawItemEventHandler (
	Object sender,
	StatusBarDrawItemEventArgs sbdevent
)
具体的には、次のようにハンドラをインストールします。
StatusBar sb = new StatusBar();
sb.DrawItem += new StatusBarDrawItemEventHandler(sb_DrawItem);
イベントハンドラで、どのステータスバー・パネルを描画すればよいのかは、StatusBarDrawItemEventArgsクラスのIndexプロパティで知ることができます。あるいは、Panelプロパティでもわかります。
実際にグラフィックスを描画するときは、Graphicsプロパティを利用します。
では、サンプルを見てみましょう。
// status05.cs

using System;
using System.Drawing;
using System.Windows.Forms;

class status05
{
    static StatusBarPanel sbp01, sbp02, sbp03;

    public static void Main()
    {
        Form fm = new Form();
        fm.Text = "猫でもわかるC#プログラミング";
        fm.BackColor = SystemColors.Window;

        StatusBar sb = new StatusBar();
        sb.Parent = fm;
        sb.ShowPanels = true;

        sbp01 = new StatusBarPanel();
        sbp02 = new StatusBarPanel();
        sbp03 = new StatusBarPanel();

        sbp01.Width = 50;
        sbp01.Alignment = HorizontalAlignment.Center;
        sbp01.Style = StatusBarPanelStyle.OwnerDraw;

        sbp02.AutoSize = StatusBarPanelAutoSize.Spring;
        sbp02.Style = StatusBarPanelStyle.OwnerDraw;

        sbp03.Alignment = HorizontalAlignment.Center;
        sbp03.Width = 50;
        sbp03.Style = StatusBarPanelStyle.OwnerDraw;

        sb.Panels.Add(sbp01);
        sb.Panels.Add(sbp02);
        sb.Panels.Add(sbp03);

        sb.DrawItem += new StatusBarDrawItemEventHandler(sb_DrawItem);

        Application.Run(fm);
    }

    static void sb_DrawItem(object sender, StatusBarDrawItemEventArgs sbdevent)
    {
        Graphics g = sbdevent.Graphics;
        Font font = new Font("MS ゴシック", 14);

        switch (sbdevent.Index)
        {
            case 0:
                g.FillRectangle(Brushes.Red, sbdevent.Bounds);
                break;
            case 1:
                g.FillRectangle(Brushes.Blue, sbdevent.Bounds);
                g.DrawString("粂井康孝・著", font, Brushes.White, new PointF(sbp01.Width + 30, 2));
                break;
            case 2:
                g.FillRectangle(Brushes.Yellow, sbdevent.Bounds);
                break;
        }
    }
}
sb_DrawItemイベントハンドラを見てください。sbdevent.Indexで、描画すべきステータスバー・パネルを場合分けします。Indexは、sb.Panels.Addで、ステータスバーに加えた順番に0,1,2,...と番号がつきます。
Indexが0の時、FillRectangleメソッドで赤い矩形をオーナードローしています。
StatusBarDrawItemEventArgsクラスのBoundsプロパティで描画される境界の四角形を取得している点に注意してください。
FillRectangleメソッドについては、すでに第14章で解説しています。
さて、オーナードローの時注意すべき点は、座標はステータスバー・パネルの座標ではなく、ステータスバーのそれを使います。
Indexが1の時のDrawStringメソッドの3番目の引数を見てください。sbp01の幅に30を加えたものをx座標としています。
では、実行結果を見てみましょう。
 さて、このフォームの境界をドラッグしてサイズを変更すると・・・
 文字列の描画開始位置のx座標は、当然変わりません。
では、文字列をこのパネルの中央に表示したい場合はどうすればいいのでしょうか。
sbp02のAlignmentプロパティをHorizontalAlignment.Centerにしてもだめですね。
このプログラムを改良して、中央表示になるようにしてみてください。
Update 22/Feb/2007 By Y.Kumei